26 January 2021

Australia Day Flames of War Game - Battle of Hannut

With group games becoming a thing again, I put my hand up to take part in Django and Nigel's 'A Thousand Tank' participation game recreating the Battle of Hannut. I played the first day of the game in October 2014 and it was a lot of fun seeing that many 15mm tanks on a table.

The game would use Battlefront's Flames of War (version 3) Total War rules, breaking the wargaming day up into two sessions, representing the first and second days of the battle. Each day will comprise six turns and would be played on a 6x8 foot table with the same terrain layout.

While you may never have heard of it, it was one of the largest tank battles in history, involving about a thousand tanks (and hence the title of the game).

Briefing
13 May 1940 - Following successful attacks on Denmark and Norway, Germany launched its forces against the combined armies of the Netherlands, Belgium, France and the United Kingdom.

Eastern France is secure behind the Maginot Line, a series of powerful forts from the Swiss border as far north as Sedan. Here the Meuse River turns north, marking the western boundary of the Ardennes, a hilly, forested area with narrow roads, presumed impenetrable by tanks. Further north there is a gap between the forest and the Belgian fortifications around Liege, notably Fort Eben-Emael (10-11 May 1940), which fell to the Germans (with heavy casualties) after Fallschirmjäger landed on top of the fortress with gliders and using explosives and flamethrowers to disable the outer defences of the fortress.

Implementing their pre-war plan, the Allies moved into Belgium to defend the river Dyle, east of Brussels. The French and British need at least three days to complete the move and dig in. To cover this, the French High Command ordered General René Prioux’s Corps de Cavalerie to hold the area around Hannut and Gembloux for this time.

German General Erich Hoepner was given the task of the matador, demonstrating with sufficient enthusiasm in the Gembloux Gap to hold the French light mechanised divisions (Division Légère Mécanique (DLM)) in place, far from the breaching of the Meuse at Sedan and elsewhere along the wide river.

The forces were drawn from Prioux’s corps with the elite 2nd DLM and the recently formed and under-trained 3rd DLM for the French and for the Germans the XVI Armee Korps consisting of the 3rd and 4th Panzer Divisions.

The challenge for Andreas and I (as the Germans) to pin the best French armoured troops in Belgium (under Phil and Wal) and prevent them interfering with the crucial crossing of the Meuse, while at the some time ensure we weren't delayed to allow the First Army to dig in.

Andreas and I split our forces roughly in half, with Andreas taking the right flank and myself spearheading the centre left side of the field. The German side is on the right in the first photo. As actual Germans, Andreas communicated in German with each other. And just like the Germans with the Enigma machine we thought it was a secure form of communication...

Day 1

Day 2

Debrief
It's a long day, and coordinating that may platoons (even amongst two players) is exhausting. Andreas and I failed to push hard enough (if not towards the town in the centre then the villages on the right flank) on the first day which made the launching off points on day two that much further back than would be optimal. On the second day I failed to hold the left flank (instead making a piecemeal attack and leaving the Pakfront exposed to Wal's French tank assaults). When Andreas left early I took over his forces, and was able to break Phil's division... but he held on by his fingernails as Wal had granted him control of Somua tanks (all that was left on the right flank). We failed to create a clear line along the roads from our base edge to the opposite table edge. What didn't help was some open terrain for our truck born infantry to traverse and being terrible (extremely terrible) at being unable to unpin a lot of our units. The six-turn time limit for each day doesn't leave much room for early setbacks.

Well done to Phil and Wal (who also understood a lot of what we were saying - which was the biggest mistake we made!) on blunting this attack, obtaining a major strategic and tactical victory.

Thanks too to Django and Nigel for organising, umpiring, and letting us use your miniatures (and apologies to the ones that got a knock).

Playing on a 6’ x 8’ table really gives a good game as armour has a chance to manoeuvre and artillery needs to be deployed with care.

25 January 2021

Battletech Repainted Demi-Company of Mechs

Back around 2006-2009 I played a little bit of Battletech. At that time (around May 2006) I got my first Battletech miniatures: an Assassin, Panther, Unseen Longbow and a few Locusts.

I painted them to an average standard as at the time Phil was running a tournament with an extremely fun auction element (run via group email). There was fierce bidding, as some players were keen to get their favourite mechs, and pay a premium for that. There was little time between the auction and the tournament (run over several weeks) games (hence the quick paint jobs). I don't remember these games, but I imagine I fared averagely with the Assassin, Panther, Locust and Spider (borrowed). I don't care, as it did get me hooked on the game and background. (Technically my first Battletech miniature was a stumpy little Atlas a family friend gave me in the early 90s, and I have just worked out it's from FASA's PlasTech range: https://www.sarna.net/wiki/PlasTech.)

After this tournament, in late 2008, I purchased Catalyst Games' Classic Battletech introductory box set (https://www.sarna.net/wiki/Classic_BattleTech_Introductory_Box_Set). The box set gave me some miniatures and maps. Even at the standard of the day, the miniatures were quiet average. I've painted a few, but I'm really not happy with them. Follow up acquisitions include a Marauder (2008), Blackjack and Vulcan (both 2009).

Which brings us up to the present.

I didn't get onboard with the recent Kickstarter, but it has renewed interest in the game in several of my wargaming circles. So I thought it was time to paint what I had, and bight the bullet and repaint the ones I wasn't happy with. This batch would include the unpainted Marauder, Blackjack and Vulcan, along with the painted Panther, Assassin and Longbow.

Blackjack:

Vulcan:

Unseen Longbow:

My original paint schemes were loosely based on Bundeswehr Cold War-era winter camo, plain grey and German late WWII assault camo schemes. And all with winter bases (yeah, I haven't played on any appropriate maps either). The Blackjack, Vulcan and Marauder were already undercoated black, the other three were painted in the winter camo.

They don't look coherent and so my plan to try and fix this I'll start on a grey base (some mechs left in their original "looted" colour) and either over paint everything in green and sand (similar to American WWII North Africa camo) or other camo schemes on the grey using these colours (e.g. assault or American Desert Battle Dress Uniform). My mechs would also be part of a mercenary unit, and so to tie all of the mechs together I will give the mechs red left shoulders and red right hands. Haven't thought of a name yet, but probably something with "Panzer" in the title.

First attempt at this camo:

I'm happy with the Vulcan's camo, but the Blackjack needs something more to make it looks less like he's wearing pyjamas or something. Probably by adding grey, bronze and gunmetal panels to break up the mechs that need it. I added larger khaki splotches on the Blackjack to help with this too.

Progress:

Finished demi-company of mechs; having varnished, added decals and static grass (that is versatile in its neutrality).

BJ-1 Blackjack (Iron Wind Metals): 

VL-2T Vulcan (Iron Wind Metals):

Unseen MAD-3R Marauder (Ral Partha):

Unseen LGB-0W Longbow (Ral Partha):


ASN-21 Assassin (Iron Wind Metals):

PNT-9R Panther (Iron Wind Metals):

About another 25 mechs to paint, but I'm in no rush to get them done as most of those are the plastic ones.

24 January 2021

Flags of Our Zombies Chapter 3: Running into Trouble

Derek and Patrick decided to brave Pine Creek once more, and head into the town to try and find vital medical supplies for Liam. Covering themselves in gore from downed Walkers, they sneak through the heart of infested territory.

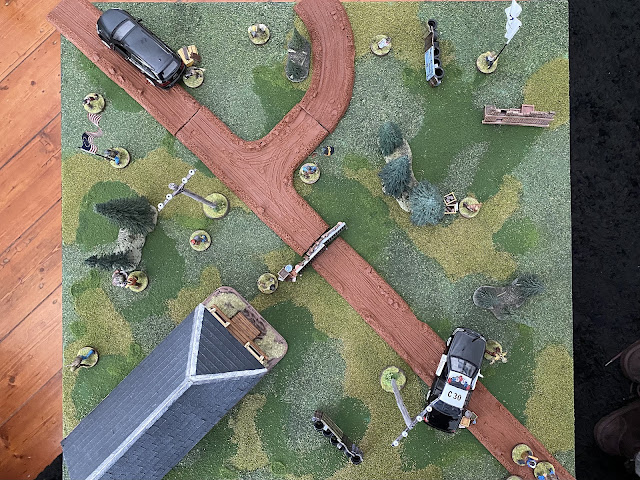
Both Derek and Patrick had gory clothing, Derek with his hatchet and small knife, Patrick with his trusty baseball bat, (and Bitzer Maloney along for the ride again). The group would need to travel from the bottom right back to their car (top left) on the bird's eye view of the board below.


There are no supplies in this scenario (page 10 of 'Days Gone Bye'), but one of the five markers a is the "Munitions Store Special Objective" marker. Instead of using the markers on the board, I shuffled them and would flip one every time I searched an objective.

Started off slowly (though 'The Hunger' were the first two Event Cards I drew, increasing the Threat level), I had both of them sneaking and attempting to reduce the Threat Tracker (only being successful after four rolls). The first two objectives yielding nothing, but the central one was what I was after. Now to get off the board.

The only combat was when I ran my group into "Release the Kraken" Joe, as I couldn't see a gap. I failed my Noise roll (as I had run with my Gory Clothes) with Derek, so there was a second walker joining the combat. This wasn't a concern, as combined they rolled six hits (with a head shot) to take them out.

In between this I had drawn the 'Escaped Livestock' Event Card again. This time the chickens weren't so lucky...

Sneaking up to the car to avoid the herd around the chicken bones, the group managed to avoid a 'Mega Herd' and 'Fire!' Event Cards that signalled it was time to leave.

I'm planning to run this as a story based campaign using the scenarios from the first three books, and the characters and equipment that I started with, the scenarios suggest or what I find in supplies (but will have to pay for when put a group together for a scenario). So far I have:

As Derek and Patrick drove back to their camp, they were hoping that they would be able to stop Liam from turning into one of those things...


Flags of Our Zombies Chapter 2: City Slicker

(* Well should really be "Small Town Slicker".)

Leaving his friends behind, Derek undertakes a short journey to Pine Creek to search for other survivors or a working car. Forced to travel on foot, Derek is initially overwhelmed by the Walkers outside a Walmart. Now he is trapped in an unknown town crawling with the walking dead...

As I had won the previous scenario, I was able to load up on what I imagine (to maintain the story telling element of the campaign) what was in the police car.

Derek dropped the screwdriver and scythe for a hatchet and small knife, a Colt 1911 pistol, ammo and a small keepsake. I would aim to only use the hatchet and small knife to prevent any Mayhem being caused. Bitzer Maloney would accompany Derek, but would have (for now) no impact on game mechanics.

The scenario requires Derek to move from the bottom centre, to the top centre. The primary aim for Derek is to find a car with a set of keys. The Audi at the top of the board with the backpack next to it would provide this.

I started off by sneaking to the supply counter to Derek's left, yielding an old gun (better than a walker or a bear trap!).

Event cards early on were not a concern for me ('Forest Walkers' and 'Fire'), and I engaged the Kekistan flag bearer in the centre of the table as I imagine he'd cause a problem later on.

Sure enough, after I engaged the walker at the car, I drew the 'Grim Recognition' event card - forcing me to roll for panic (something Derek hardly ever has to do), The 'Terrified' result meant I only had one action, but with the walker taken out I was able to search the backpack, gaining keys for the car and some bandages.

The 'Mega Herd' event was thankfully not rolled earlier, I don't think I could have handled this many walkers!

Derek whistled for Bitzer to get in the car, the fuel gauge was almost full, "Bonus" thought Derek as he drove quickly back to the others.

A successful mission (we'll never speak of the first attempt where Derek got swamped by three walkers and died...).

Game 3 can be found here.

23 January 2021

Flags of Our Zombies Chapter 1: Gun Running

17 January 2021: Derek had just woken from a coma, finding the world a changed place. The coma was probably due to the Jägerbombs he had consumed the night before, having rented a cabin with some friends for the weekend. It was Liam's buck's and they were all happy to try and forget the horrors from a week ago when Trump's supporters had stormed the Capitol in Washington, D.C.. Reports had been coming in while they were staying at the cabin that after the rally a lot of the demonstrators had turned into things... like walking dead... the world was definitely getting weirder.

After an instant coffee to try and get themselves awake, Derek, Patrick and Liam set out for the nearest town to secure a stash of weaponry and a car with which to weather the storm...

I finished off my storming of the Capitol flags during the week (see here), and was keen to use them in a game. All year I've been wanting to revisit Mantic's 'The Walking Dead: All Out War' for some Covid-themed solo zombie games.

Although I've picked up a few things here and there since painting some of the core set a few years ago, I haven't painted anything since (though a lot of the scenery was painted in 2020). Getting some zombies from Jack for Christmas has been the kick I needed to finish off what I have.

Onto the games. I aim to play a story-driven campaign set in the area east of Washington in January 2021. I'll base it around Derek (the miniature reminds me of Bruce Willis for some reason) as the sort of Rick Grimes central character and his story. I'll add other characters as I see fit (hey - I might even paint something new!).

The first scenario (page 6 of 'Days Gone Bye') requires moving to the diagonally opposite corner and making a successful Smash roll. For this game the guns, etc would be in a looked highway patrol vehicle (top right), while the group start the game bottom left (I didn't take an overview photo to show the whole table unfortunately).

Derek was armed with a screwdriver, Liam a kitchen knife and Patrick with his baseball bat (perfect combination). Patrick moved off to the left to cover the old cabin side, taking down a walker and getting the ammo reload supply card, while Derek and Liam followed the road, taking out a walker and Derek gaining the scythe supply card. Full disclosure - for this game I forgot you can only use one weapon at a time, so all of Derek's rolls stack the scythe with the screwdriver. Must have been the instant coffee that made him so good in combat.


Liam joined Patrick in the middle of the board to take out a pair of walkers who were relentlessly waving Trump support flags. While Derek and Patrick are good at finishing off mindless walkers, Liam is definitely not suited and shouldn't be doing this on his own (I took a risk here and luckily it paid off).


Meanwhile the Event cards had been nothing too serious - slowly increasing the Threat level, and having me try and reduce it with the member's actions when I had the opportunity. At this point I drew the 'Escaped Livestock' Event and decided to place some livestock on the table (instead of it being just being represented temporarily by a terrain piece). The chickens were the first I came across in my collection and they share their storage with my 28mm dogs, so I picked my Bitzer Maloney to be the one that was chasing them (both are from Eureka Miniatures).

Bitzer moved towards the group (he didn't have many options as the next Event card was 'The Herd' that blocked off where the group had started from).

Liam searched a Supply counter (Flaming Brand) and needed rescuing by Derek.

Patrick was the first to make it to the highway patrol car, while Derek and Liam dealt with the walker that had gotten back up again, taking it down with a head shot.

Patrick wasn't successful in smashing open the patrol vehicle, so Derek tried (as Patrick was now dealing with walkers) and succeeded. Appropriately I got the 'Alarm!' Event card that causes mayhem, which meant Liam was now fighting walkers too. While he was successful in the first round, he got bitten the second time he fought the punk! Screaming, Derek threw him over his shoulder and Derek and Patrick jogged as fast as they could back to the cabin. Bitzer followed, barking at the trailing walkers.

As Derek huffed with slightly heavier than before Covid Liam, he knew that things were serious, there were so many walkers. So much had to be done before things returned to normal. At least he had a canine companion.

Game 2 can be found here.