29 December 2018

Things I Love - 40K Mech and Pilot

A lovely conversion of an Ork Killa Kan by Ana Polanšćak done for a group 40K project, 'Gelida: the Frozen Expanse' (see more at https://www.instagram.com/explore/tags/thefrozenexpanse), set on a frozen planet where people have to resort to utilising mechs and exosuits to traverse the world for resources.


Her contribution is this mech converted from a Killa Kan and its pilot, based on a Steel Legion guardsman. It's also (in case you couldn't tell) heavily inspired by Jakub Rozalski's art (see https://www.artstation.com/jakubrozalski),

More converting and painting goodness on the Gardens of Hecate blog:
http://gardensofhecate.blogspot.com/2018/12/200-gelida-frozen-expanse.html

27 December 2018

Painted Bits and Pieces Over Christmas

Had a few bits and pieces I wanted to paint over the quiet days and all were selected as they would have a similar colour palette, which helped in getting them done in a couple of sittings.

The first batch are some AB Figures WWII British dispatch riders to use as motorbikes in Car Wars / Gaslands type games.


The second batch is some Eureka Miniatures female peasants and chickens. They aren't available from the online store yet, but emailing Eureka or dropping into the store will allow you to get some. They are cute as hell, but I could only give them a very basic paint job as they are tiny.


And finally the last batch is of Peter Pig's USS Sandusky a Marietta-class monitor that I based a display piece for Hammerin' Iron.


Not my best painting (or photography) on these (too much food and drink in the system), but I'm glad I got these on and off my painting queue relatively quickly (well the Sandusky has been in its brown undercoat for a long while...).

22 December 2018

Last Game I Played - Battle of Amiens (1918)

For the final meeting of the League of Ancients for the year, and the last to be held at the German Club Tivoli (before the move to the Caulfield RSL), Mark ran one of his large multi-player games. This time it was in the closing months of First World War on the Eastern Front.

Historical Background
Starting in July 1918 with the Battle of Hamel, John Monash’s Australian Corps commenced to roll back the German advance from the (by then petered out) offensive of the Kaiserschlacht. This set the stage for the ultimate counter strike of 8th August, 1918. The Australian Corps and the Canadian Corps spearheaded the attack on the German Second Army south of the Somme in the Battle of Amiens, which was the opening phase of the Allied offensive (later known as the Hundred Days Offensive) that ultimately led to the end of the First World War.

By 11:00 the Australians and the Canadians had advanced three miles along a front of almost 15 miles wide. The speed of their advance was such that a party of German officers and some divisional staff were captured while eating breakfast.

By the end of the day over 13,000 Germans had surrendered with some 3 or 4 thousand other casualties against Anglo-Australian-Canadian casualties of about 8,000. But this was only the beginning of an offensive which would eventually break through the Hindenburg Line and force Germany to seek an armistice. Erich Ludendorff himself described the day as the "Schwarzer Tag des deutschen Heeres".

German Briefing
Germans from a battered Stellungsbataillon (trench battalion) await the inevitable Australian counter attack after a successful incursion by Stosstruppen in this area a few days earlier. Suddenly all hell breaks loose as a bombardment rocks the front line. Through the exploding crash of the artillery shells an ominous mechanical clanking can be heard approaching from the west together with some bizarre cries which sound a lot like ‘Cooo-eee!’, but what can this mean? Someone had best get those verdammte Stosstruppen on the field telephone and order them to send up reinforcements quickly!

Kompanie Einz and one machinegun section are manning the forward line of trenches. Kompanie Zwei and one machinegun section are manning the second line of trenches. Kompanie Drei is in reserve. A reinforced platoon of Stosstruppen are hidden in concealed deep dug-outs somewhere in our lines. Our mission is simple, hold the line or inflict enough casualties on the enemy assault troops to stop them breaking through.

Kompanie Drei may not be brought into play until at least the start of the third German move if the Oberst passes a command roll, and it then moves onto the table from one of the trench entry points.

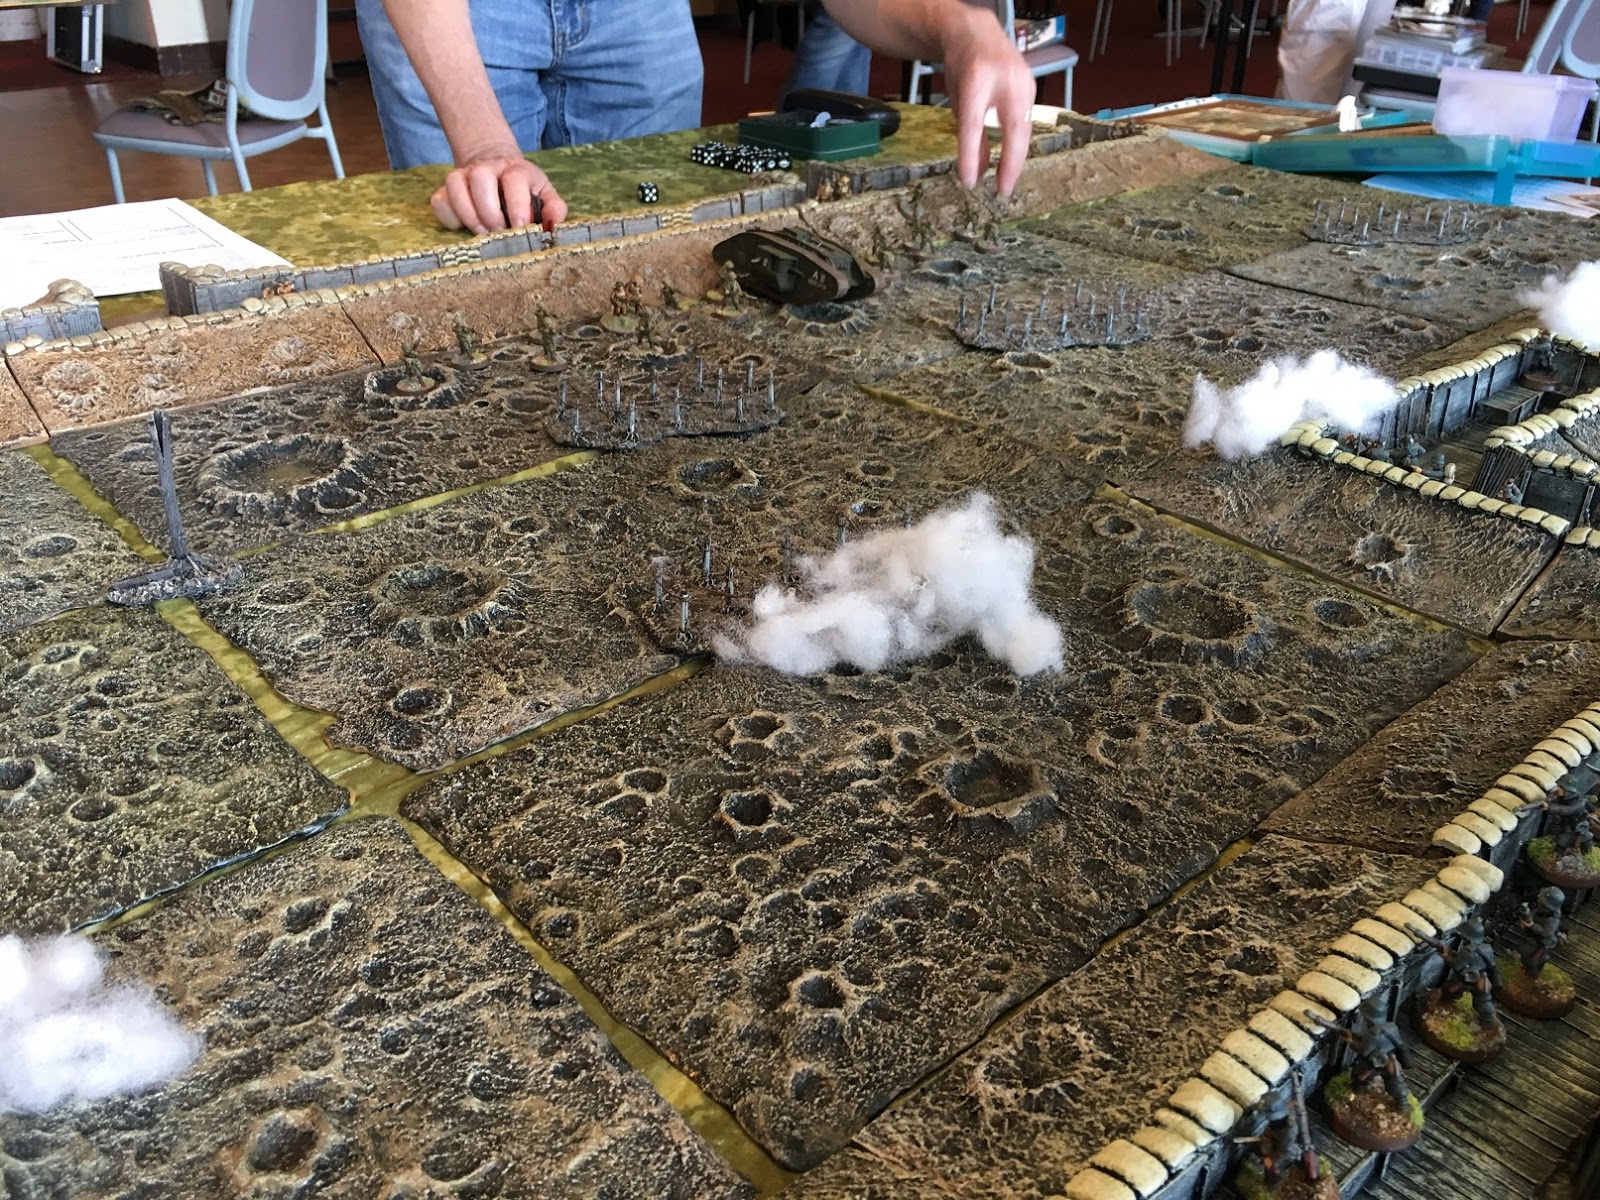
Report from the Left Flank
I took command of Kompanie Zwei and a machinegun section on the left flank, seen deployed at the bottom right of the photo below.


They started the game dug in along the second line of trenches:


As the creeping barrage was rolling towards our line (yes, that's a Mark IV male tank in the background):


But it looked like it was so far back I decided to jump out of the second line trenches and occupy the first line trench to deny them to the Australians that were running towards our lines. Unfortunately I missed the part that the smoke markers above were the back of the 12" wide creeping barrage (in my defence I was getting a beer), and as I was stuck in the open I had to roll to see if I took any S4 hits. I was lucky and took only two casualties before running back to my starting position.


As the barrage passed our lines we were able to open up with our machine guns and start inflicting some casualties of our own, but not enough (even with special ammunition our 7.7cm field gun was unsuccessful in knocking out the Mark IV).


Our reinforcements arrived, plugging the gaps in our lines (mainly the right flank).


But it was too late, with the right flank having taken a severe beating we were stretched too thin and the trench lines were conceded to the Australians as they flanked us within the second line trench.


A hard fought win for Bruce and Martin M. While Django, Martin O and myself were left wondering where we had gone wrong (the successful pinning of the Mark IV by the field gun, instead targetting the infantry in the open meant we didn't have to deal with its weapons).


Merry Christmas and all the best for the New Year.

12 December 2018

Things I Love - 58ft Towing Lighters

While searching for something completely unrelated on Google, I stumbled upon this lithographic print by Keith Ferris:


The description for this is:
The Royal Flying Corps launches a Sopwith 2F.1 Camel as a surprise for Zeppelin L.53.

The Sopwith 2F.1 Camel flown by Flight Sub Lieutenant Stuard D. Culley lifts from a "lighter" towed by the British destroyer HMS Redoubt in the North Sea on 10 August 1918. An hour later, the German Zeppelin LZ.53 was intercepted and destroyed while flying at 19,000 feet, putting an end to this unchallenged harassment of the British Fleet. LZ.53 was the last Zeppelin destroyed in WWI and Culley’s Camel ditched along side the Redoubt and was recovered.

This aircraft survives today and hangs in the Imperial War Museum in London, England.

More information on these 58ft towing lighters can be found here:
http://bumaritime.org/projects/58ft-towing-lighters/
https://en.wikipedia.org/wiki/John_Cyril_Porte#War_service
https://en.wikipedia.org/wiki/Charles_Rumney_Samson#First_World_War

The print is available from:
https://keithferrisart.com/product/just-airborne-at-sea-lithographic-print-19-12-x-23-le-750/

Car Wars Conversions 3

I finally finished the sixth toy car conversion today (while I've been home with a chest infection). This time a Hot Wheels 1968 Oldsmobile 442 that I bought back in September and converted at the time.


It got the same treatment as the others:
https://donnerundblitzenwargaming.blogspot.com/2017/05/car-wars-65-pontiac-gto-and-63-chevy-ii.html
https://donnerundblitzenwargaming.blogspot.com/2017/05/car-wars-conversions-2.html

And I painted it blue to match the set (which can be all part of the same faction or with the Volkswagen and Land Rover in a sub-faction (paired off against the earth coloured "wolves").


Some of the decals are 20+ years old, so there was a bit of swearing when I applied them, but by adding some weathering to them too (and not just the body work), I think it's come out okay. Although as I type this I see in these photos that the blues are a little off. I doubt I'll go back and fix it, as on the table it will be hardly noticeable.

The car has the giant circular saw to deal with wire lines across the road - I think I'll finish this project off with a pair of 20mm WWII bikes to act as dispatch/outriders. Currenly AB Figures WWII will be the easiest to source.

02 December 2018

Sheikh Nic and a 100 Pounder Breech-Loading Rifle

I picked up these miniatures a few weeks ago from Nic, and as I had no real use for them I painted them up for him instead.

The first is a Houston's Naval Guns and Ship Fittings 100 pounder BLR (code WC-41). I'm guessing these were used on United States Navy ships from the 1870s, but I wasn't sure so I went with a generic black/dark grey with brass fittings paint scheme.


Nice enough model, though there were a few pockmarks in the casts. It will probably be for this steam tank (photo taken from the Mana Press Facebook page):


Next up is an Arab camel rider that originally had a rifle. I cut off the rifle, and gave him a brass flagpole and extra bag (out of Greenstuff) on the left hand side.


Flag was designed by myself earlier in the year (see https://donnerundblitzenwargaming.blogspot.com/2018/10/pax-practice-game-maximillian-1934.html) and depicts the fictitious Sheikh Nic.

However, I don't know who made the original miniature. Anyone know?

Edit: according to the sleuths at Lead Adventure Forum it seems to be a sculpt from (the now closed) Jeff Valent Studios from the United States. I've tried Google image search and Way Back Machine to see the shop but can't seem to find the camel rider.